Introducton
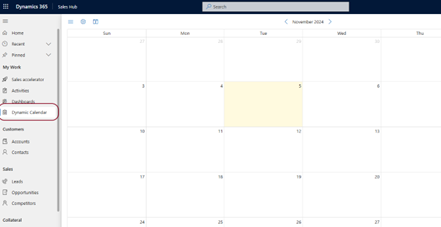
The Dynamic Calendar allows quick and simple interactions and visualizations of date-based data (such as appointments, tasks, or events), in Microsoft Dynamics 365 CRM/Sales and Model Driven Power Apps. The events or activities are presented in a clean and simple to understand calendar. This includes viewing from a month, week, and day view! Useful applications include:
- Easily view appointments for an individual or a team.
- Display tasks by their due dates.
- View the campaign and campaign activities for the entire organization.
- Create multiple Views. All Views can be viewed at the same time, or toggle between Views for more detail.
- You can also view date-based related records for your Dataverse custom entities.
This solution includes a Calendar View Configuration form to assist users with defining what records to display, what filters to use, and what entity attributes to view.
You can view the record attributes by clicking on an event and can dynamically update the record by dragging-and-dropping or resizing the event.
Dynamic Calendar also gives users have ability to create records from within the calendar.
Features Overview
Calendar Options
Dynamic Calendar can be configured as a stand-alone component on a Page within a Model Driven App, or embedded as a control component on a form for an existing entity.
| Option | Description |
| Stand-Alone | Consists of a stand-alone page that contains a calendar. |
| Embedded |
Consists of a calendar embedded into a section added to a Dynamics 365 Sales or Model Driven app form. The events in this calendar only relate to the record that the form relates to. For example, a Dynamic Calendar control embedded in an Accounts form can show Appointments for the Account, in a Calendar format. |
Views
Views allow you to separate different types of events if required. For example, you may want to separate private and business appointments. If you don’t want to miss anything, you can combine more than one View in a Calendar at a time.
There are 3 types of Views, and you can have multiple configurations for each type of View.
- Standard
A Standard View allows you to display all activities for a specific type of entity (Appointments, Tasks etc). For example, if you create a Standard View for Appointments, the Calendar will show all the Appointments for the currently logged in User.
A Standard View would typically be used for the Stand-Alone option (outlined below).
- Related
A Related View allows you to display activities for a specific type of entity (Accounts, Contacts etc). For example, if you create a Related View for Accounts, the Calendar will show all the Appointments for the currently selected Account record.
- ICS
A useful ‘View’ option is ‘ICS’ to display events like public holidays and other significant events that are not related to a specific entity.
If this is the first time Dynamic Calendar has been used in your organisation, please go to the Initial Configuration and Registration section at the end of this document.
Create a Standar View for Dynamic Calendar
- Open the Dynamic Calendar page
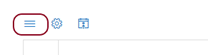
- From your Calendar dashboard, click on the ‘Show View’ menu, then select the dropdown option.
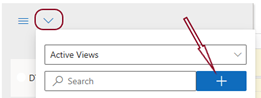
- Click on the dropdown menu, then select the ‘+’ sign to create a new view.
Follow the steps below to create a Standard Global view:
Note: Click on the lightbulb icon next to a field for hints about the field.
Define Details for your calendar events
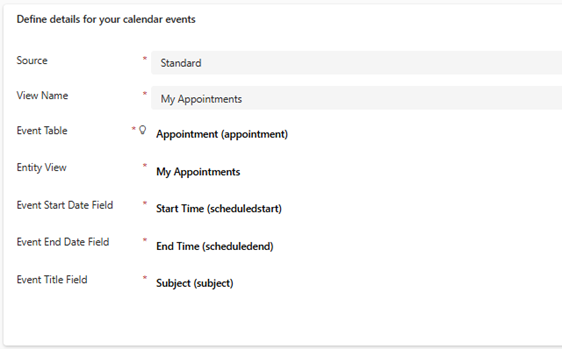
| Field | Description |
| Source | Standard |
| View Name |
Enter a Name that is descriptive of what the calendar will show. e.g. My Appointments |
| Event Table |
The Table you will use as your Event source. e.g. Appointments |
| Entity View |
This refers to the View in Dynamics that displays the Event Records. The Entity View allows you to filter the records/dates/activity type that the View will consist of. For example, by default, ‘My Appointments’ will only show the appointments for the currently logged in User. |
| Event Start Date Field |
The scheduled start of the Event record e.g. Start Time |
| Event End Date Field |
The scheduled end of the Event record e.g. End Time |
| Event Title Field |
A mandatory field that summarises the Event. e.g. Subject |
| Note | For Start and End Date fields ALWAYS use ‘Schedule’ dates NOT ‘Actual’. |
Do you want this view to show or not.
- Keep ‘Display Active’ allows you to hide or show the View. The option is helpful when creating a global view to restrict users from turning on or off the view.
- For now, set this option as ‘Yes’.

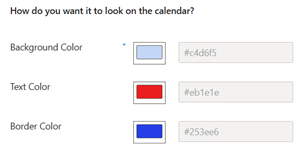
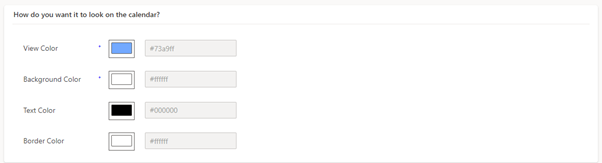
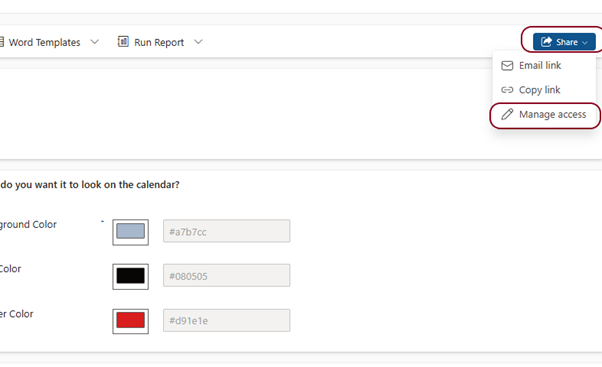
How do you want it to look on the calendar?
- You can colour code the view. The is not mandatory but it is recommended that you select different colours for different view based on the entity you have selected for the view.
- You can color code the view. While not mandatory, it’s recommended to select different colors for each view based on the entity you have selected. This helps in visually distinguishing between different types of views and ensures better visibility, especially when the background and text colors are similar.
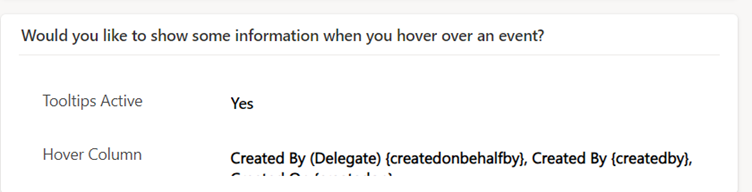
Would you like to show some information when you hover over an event?
Tooltips are a message that appears when a cursor is positioned over an icon, image, hyperlink, or other element. You can Select multiple columns to show tooltips
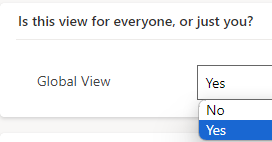
- Change the dropdown to ‘Yes’ for Global view field and ‘No’ for a Personal view. For now, set this to
- For now, set Always On to Yes

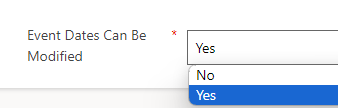
- Give ability to modify the event dates by selecting ‘Yes’ from the drop-down option under ‘Event Dates Can Be Modified’ field. Select ‘No’ to restrict users from modifying the dates.
- Click ‘Save’ or ‘Save & Close’.
Tip
Whenever you add or modify any View, make sure you Refresh your browser (F5) at least once. Some-times, you may need to Refresh twice.
Adding a Related View on the Calendar
Reminder: A Related View allows you to display activities for a specific type of entity (Accounts, Contacts etc). For example, if you create a Related View for Accounts, the Calendar will show all the Appointments for the currently selected Account record.
- From your Calendar dashboard, click on the ‘Show View’ menu, then select the dropdown option.
- Click on the dropdown menu, then select the ‘+’ sign to create a new view.
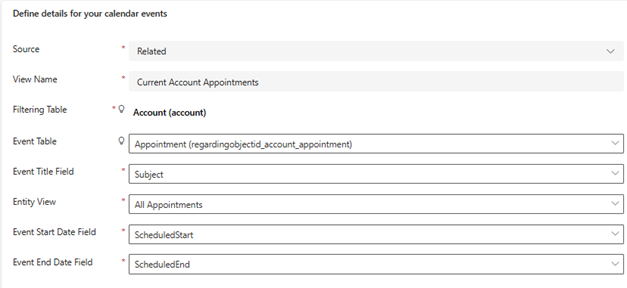
Define Details for your calendar events
| Field | Description |
| Source | Related |
| View Name |
Enter a Name that is descriptive of what the calendar will show. e.g. My Appointments |
| Filtering Table | Use Filtering Table to select your Source event table by (eg. if you want to see appointments as events for an account, select accounts here, if you want to see tasks as events for a user, select users here…etc) |
| Event Table |
The Table you will use as your Event source. e.g. Appointments |
| Event Title Field |
A mandatory field that summarises the Event. e.g. Subject |
| Entity View |
This refers to the View in Dynamics that displays the Event Records. The Entity View allows you to filter the records/dates/activity type that the View will consist of. Because we are looking at events for a specific record (Account) we probably want to see Events for All Users so ‘All Appointments’ would be appropriate. |
| Event Start Date Field |
The scheduled start of the Event record e.g. ScheduledStart |
| Event End Date Field |
The scheduled end of the Event record e.g. ScheduledEnd |
| Note | For Start and End Date fields ALWAYS use ‘Schedule’ dates NOT ‘Actual’. |
There are two view type that can be created, one as global and other as a personal view. Follow the steps below to create a view:
- Change the dropdown to ‘Yes’ for the Global view field and ‘No’ for a Personal view.
Do you want this view to show or not.
- Keep ‘Display Active’ allows you to hide or show the View. The option is helpful when creating a global view to restrict users from turning on or off the view.
- For now, set this option as ‘Yes’.
How do you want it to look on the calendar?
- You can colour code the view. The is not mandatory but it is recommended that you select different colours for different view based on the entity you have selected for the view.
- You can color code the view. While not mandatory, it’s recommended to select different colors for each view based on the entity you have selected. This helps in visually distinguishing between different types of views and ensures better visibility, especially when the background and text colors are similar.
Would you like to show some information when you hover over an event?
Tooltips are a message that appears when a cursor is positioned over an icon, image, hyperlink, or other element. You can Select multiple columns to show tooltips
- Change the dropdown to ‘Yes’ for Global view field and ‘No’ for a Personal view. For now, set this to
- For now, set Always On to Yes
- Give ability to modify the event dates by selecting ‘Yes’ from the drop-down option under ‘Event Dates Can Be Modified’ field. Select ‘No’ to restrict users from modifying the dates.
- Click ‘Save’ or ‘Save & Close’.
Create ICS view for Dynamics Calendar
An ICS calendar refers to a universal calendar file format used by various email and calendar programs. It’s often used to share calendar events and schedules between different platforms.
In Dynamic Calendar, an ICS Calendar is useful for displaying events like Public Holidays, School Holidays and other significant events like elections and corporate anniversaries.
Generally, an ICS Calendar is shared will all members of an organisation.
You can create multiple ICS Calendars to represent different types of events. For Example, one for School holidays and one for Public holidays. Of course it is possible to have both in one View.
- From your Calendar dashboard, click on the show view menu. and click on the dropdown.
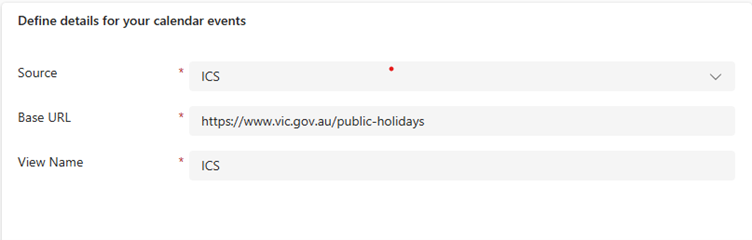
Define Details for your calendar events
|
Field |
Description |
|
Source |
ICS |
|
Base URL |
Points to the location of the calendar data |
|
View Name |
Enter a Name that is descriptive of what the calendar will show. e.g. My Appointments |
- Click on the dropdown menu, then select the ‘+’ sign to create a new view.
Do you want this view to show or not.
- Keep ‘Display Active’ allows you to hide or show the View. The option is helpful when creating a global view to restrict users from turning on or off the view.
- For now, set this option as ‘Yes’.
How do you want it to look on the calendar?
- You can colour code the view. The is not mandatory but it is recommended that you select different colours for different view based on the entity you have selected for the view.
Would you like to show some information when you hover over an event?
Tooltips are a message that appears when a cursor is positioned over an icon, image, hyperlink, or other element. You can Select multiple columns to show tooltips
- Change the dropdown to ‘Yes’ for Global view field and ‘No’ for a Personal view. For now, set this to
- For now, set Always On to Yes
- Give ability to modify the event dates by selecting ‘Yes’ from the drop-down option under ‘Event Dates Can Be Modified’ field. Select ‘No’ to restrict users from modifying the dates.
- Click ‘Save’ or ‘Save & Close’.
Edit a View for Dynamics Calendar
Some settings of an existing view can be edited after they have been created.
You can’t change the Source or View Name.
Changing any of the other settings in the Define details for your calendar events will have significant effects on how the view behaves so proceed with caution.
Other settings, particularly How do you want it to look on the calendar?, can be modified to change the way the selected view looks and is displayed.
- From your Calendar dashboard, click on the show view menu. and click on the dropdown.
- Select the View you want to Edit and the Dynamic Calendar View form will open so you can edit it.
Sharing and Showing Calendar Views
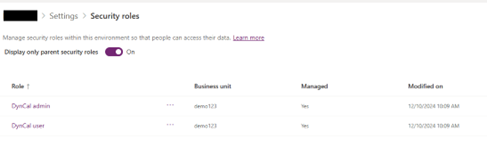
Creating and having access to Calendar Views is controlled by Dynamics 365 Security.
Dynamic Calendar Users must be assigned the DynCal admin or DynCal user roles. These roles are created when the Dynamic Calendar Solution is imported and will generally be managed by your Dynamics 365 System Administrator. This is not covered in this document.
The creator of a Calendar View can Share the View with other Users or Groups. With the Calendar View edit form open, in the top right-hand corner click on Share/Manage access
- From your Calendar dashboard, click on the show view menu. and click on the Show View Menu.
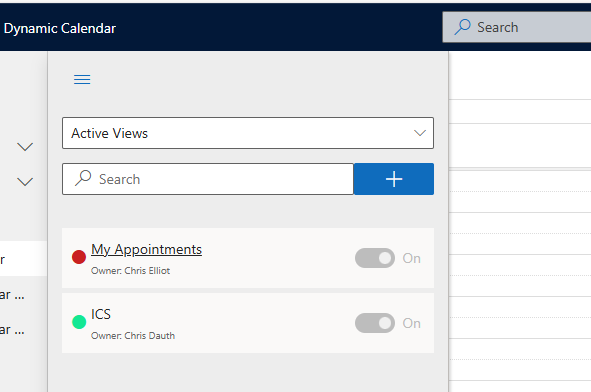
- Make sure All Views is selected so all the Views you have access to are displayed.
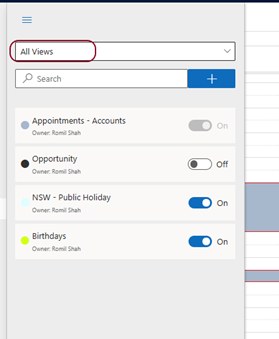
Toggle Views On and Off as required.
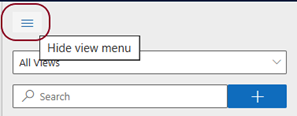
- Click on Hide view menu when you are finished.
Embedding a Calendar View
Embedding a calendar involves placing an existing View (normally Related) on a form within a model-driven app. It refers to a component that integrates a calendar interface directly into the form’s layout. This feature enables users to visualize and interact with date-based data, such as appointments, tasks, or events, without leaving the context of the current record.
By embedding a calendar view on a form, users can conveniently manage time-sensitive information within the same screen, enhancing productivity and workflow efficiency.
Follow the steps below to create an embedded calendar.
- Open make.powerapps.com.
- Create a Calendar View if you already haven’t.
- Select the Entity you want to add the form to (e.g. Accounts).
- Select and Open the form you want to add the Calendar to. This will open the Form in the Form editor.
- Place the Cursor on the Form in the column you want to place the Calendar in.
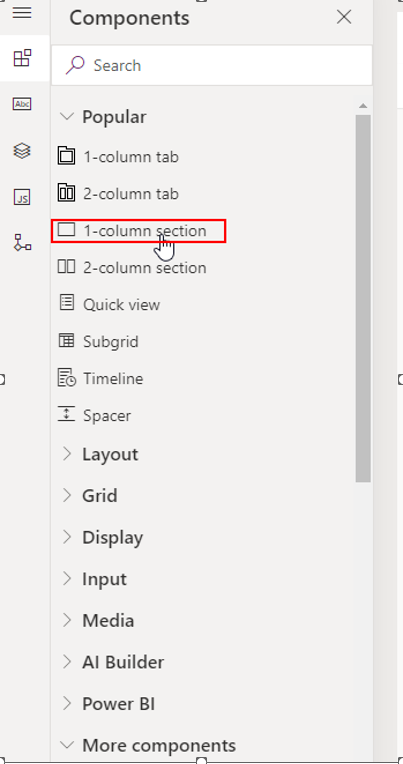
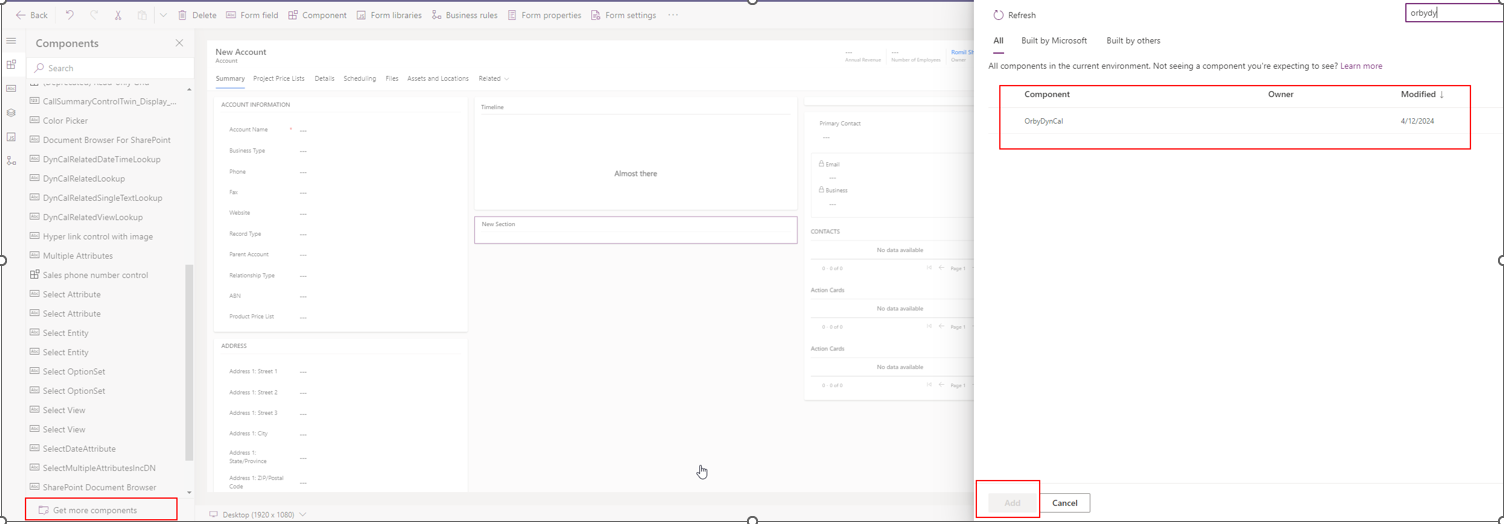
From the component tab on the left, click on 1-column section.
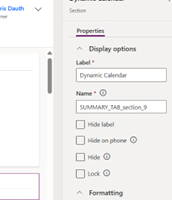
- A new Section will be added to the form.

- Edit the Name of the Section
- Expand the More Components section and select ‘OrbyDynCal’ from the list. If ‘OrbyDynCal’ is not listed, click on ‘Get More Components’ and search for ‘OrbyDynCal’ and click ‘Add’.
- Within ‘OrbyDynCal’:
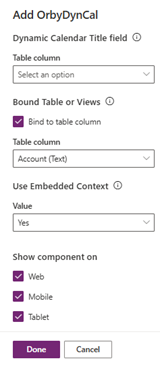
-
- Tick the checkbox for ‘Bind to table column’,
- Change the value to ‘Yes’ for Use Embedded Context,
- Tick the checkboxes ‘Web’, ‘Tablet’ and ‘Mobile’, and click ‘Done’.
- ‘Save and Publish’ the form to apply the embedded calendar view configuration.
- The embedded calendar will now appear on the entity for which the form is configured.
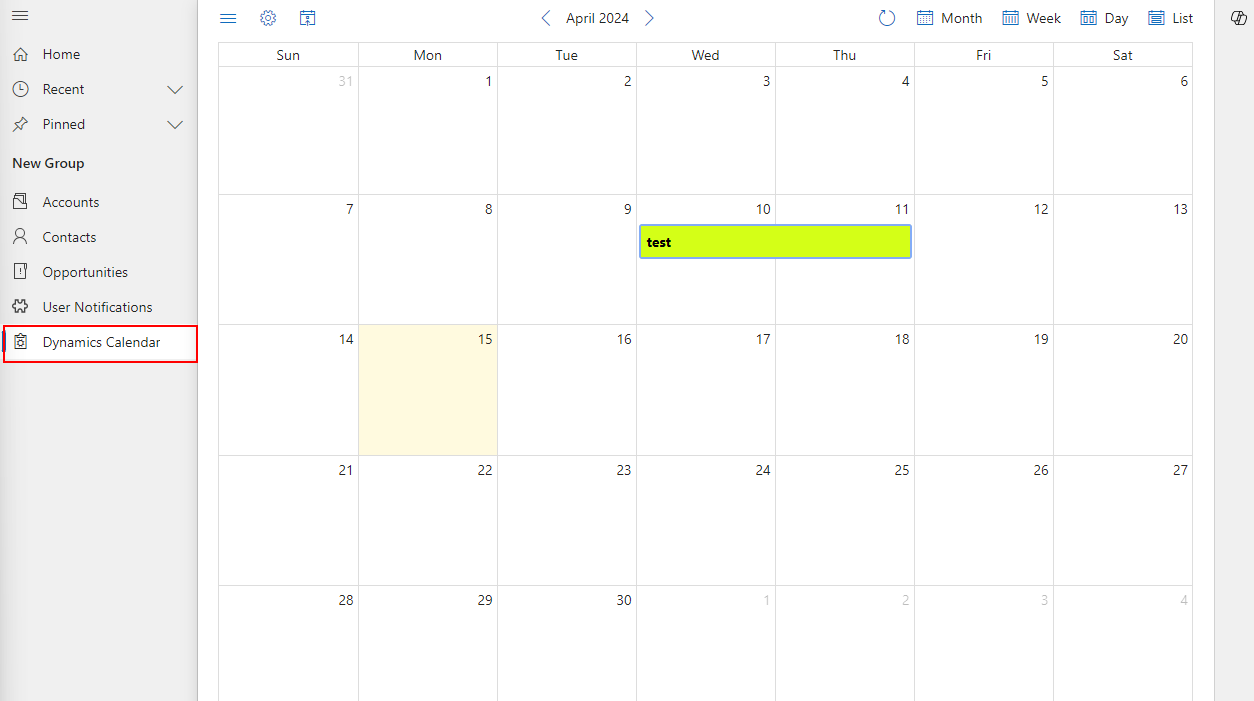
Dynamic Calendar Navigation
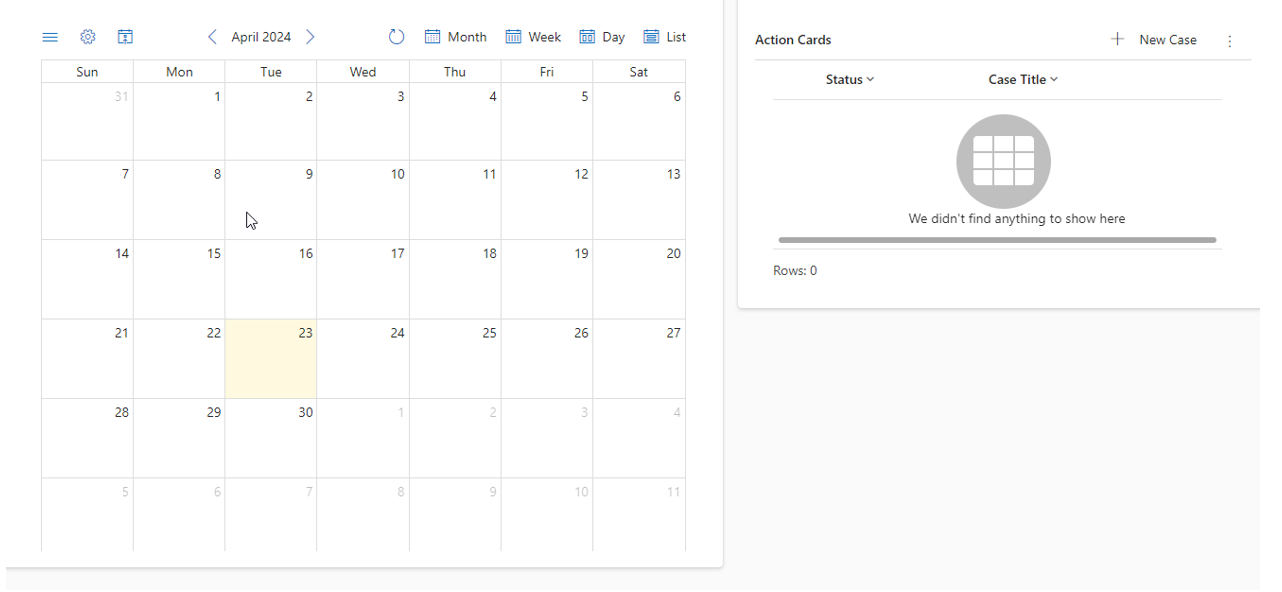
The Dynamic Calendar consists of options as show below:
- Event view settings – To navigate to the manage view settings.
- Manage view – To manage or create a new view.
- Previous and Next button to navigate to different day, week or month based selected view.
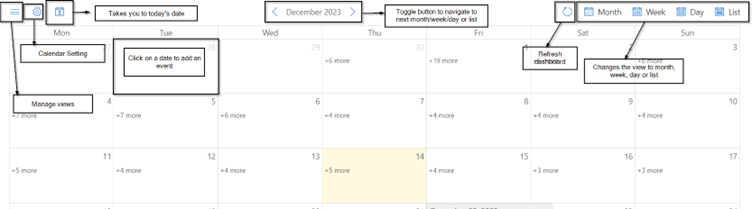
Calendar Settings:
Calendar setting gives flexibility to show you the dashboard based on the preferred view. It allows to set the default view to be monthly, weekly, daily or list view. Daily work hours can also be configured.

Adding an Event to a View in Dynamic Calendar
- To create an event, first select a View, either in the Stand-Alone Calendar Page or an Embedded Section.
- Click on the date/time and select the View from the drop-down options.
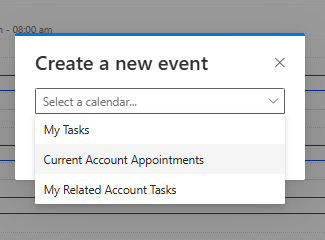
- I have selected ‘Current Account Appointments’ for this example. The ‘New’ form will open. This is the standard form you use in Dynamics and the Form type will be relevant to the type of Event you have set for the View you selected. In this case it is an Appointment but could be a Task, Event etc.
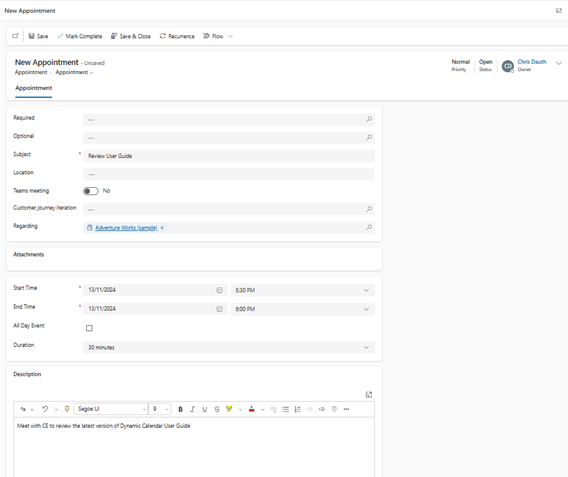
- If this Event is connected to another Dynamics Entity (Account, Contact etc), it is very important to select the appropriate record in the Regarding
- Save and close the record after all the relevant appointment details are entered.
- The event will be displayed in the Calendar.
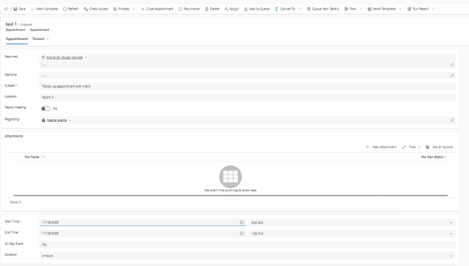
Modifying a Calendar entry
A calendar event can be modified via the Dynamics Calendar by clicking on the event and making the necessary changes.
Steps
- Navigate to the ‘Dynamics Calendar’ from the left side menu option or navigate to an Embedded View in a Dynamics record.
- Find the entry on the view of the dashboard and click on it. The standard Dynamics Form will open. The Form that opens is the default form for this type of Event. In this example it is an appointment.
- Make the required changes and save and close the record.
Initial Configuration and Registration
Before you can configure Dynamic Calendar, the Solution you downloaded for the Microsoft AppSource needs to be imported into your Microsoft Environment and then published. Normally this is performed by a System Administrator. This process is not covered in this document.
The Solution includes a Dynamic Calendar Stand-Alone Page. This page needs to be added to the Power Apps/Dynamics application you want to use it with.
Visibility of Dynamic Calendar Views is controlled by Microsoft Security. The exception is any User who is assigned the ‘System Administrator’ role. These users can see all Views, depending on their Personal Settings.
The ability to see a Dynamic Calendar View is determined by:
- Access to the Dynamics Calendar View Users need to be assigned the DynCal admin or DynCal user roles.
- Owner of the View record in Dynamics Calendar View Users need to be Owner of the View or belong to the Team that owns the view.
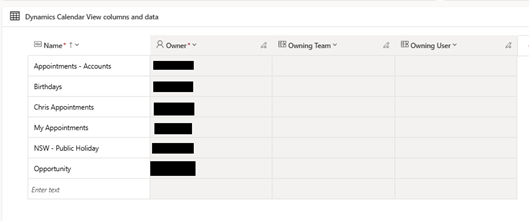
A user can see the views they own or are owned by a Team they belong to. For each entity you want the user to see, an admin will have to provide role (read) permissions to read the table associated with the view to the Dyncal user role, and if they want the user to be able to dynamically create those records from the calendar they have to provide write and create permissions as well.
Register Dynamics Calendar
- If this is the first time Dynamic Calendar has been opened, you will be prompted to register.
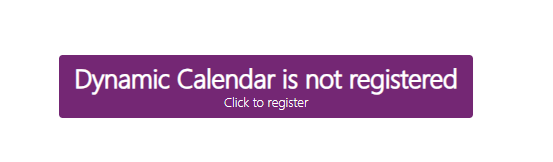
- Click on Click to register
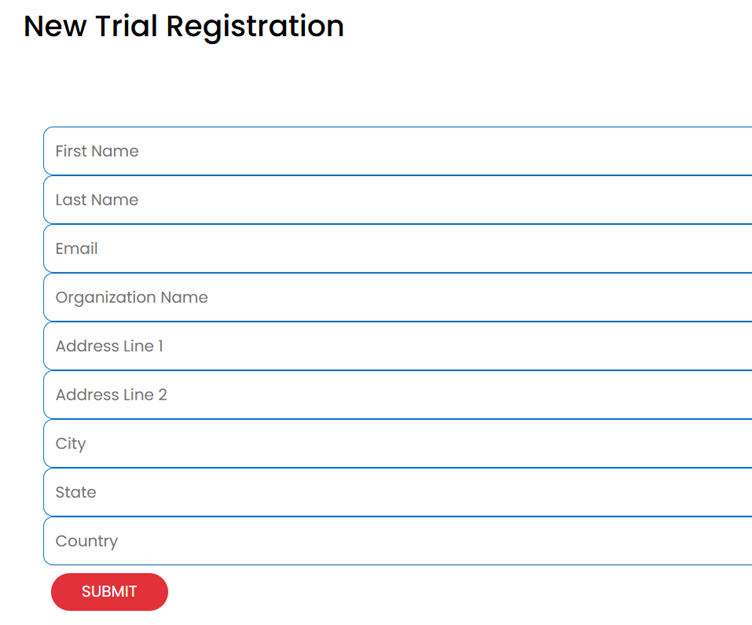
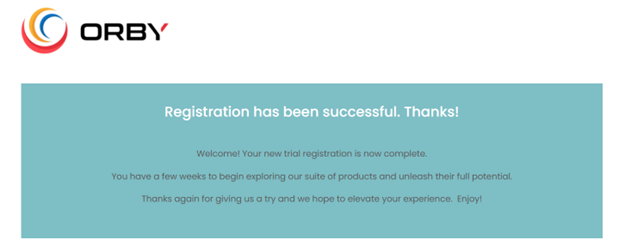
- Enter your details and click on (SUBMIT)
- You will be notified when the registration process accepts your details.
- You can close this page.
- The background process may not have completed yet so wait a minute. Then go back to the application and refresh the page (F5).
- You will see the custom page with the name you would’ve mentioned in the earlier step.
Dynamic Calendar is now ready to be configured with a “View”.