The way to add a PCF control to a BPF as provided by Microsoft is quite hard. The process requires you to export a solution containing your BPF, the component configuration on a different form and manually editing the solution XML. This process is prone to mistakes in the best of times and is also not user friendly for a citizen developer. Luckily Clément Olivier and Tanguy Touzard have developed a plugin named PCF 2 BPF which can be used from within XRM Toolbox. This article demonstrates how you can add a custom control to your BPF using this plugin in a few simple steps. I am using the Checkmark control to change the look of a read only Boolean field on the BPF for this article.
Adding the code component using PCF to BPF:
The steps involved are simple. Import the checkmark solution in the desired environment. Next, load the Xrm ToolBox, connect to your environment, and load the PCF 2 BPF tool.
Within the tool, click on Load BPF Entities. This will give us a list of Business Process Flow records. When we choose the BPF we want we get all the stages and fields as seen below:

Next, click on the field where you want to change the component. Similar to how you would add a custom control using the form editor, select the form factor you want to change the component by pressing the Plus button. Do not forget to press Add Control / Apply Changes as else your change won’t take effect. Finish by pressing Update and Publish. The gif below showcases the process in action:
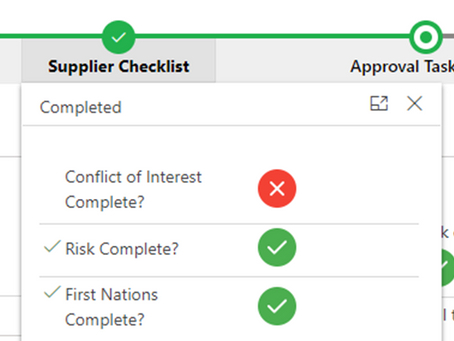
If everything goes as expected, you can see the result by simply refreshing your form:
