
This article is part of a series of useful tips and tricks that can be used in Power Automate flows.
In part 1 we went through local cache, and in part 2 of this series I will explain how to:
- Generate a PDF file using a Microsoft Word template from a flow
- Display a check box on the Microsoft Word template using a flow
- Create a child flow that generates a file and returns that file to the parent flow
How to create a Microsoft Word Template and use it in Power Automate Flows
The following list shows the steps required to create a Word document that can be used in a flow:
1. The developer tab needs to be enabled and added to the Microsoft Word ribbon. The developer tab can be added from the “Options> Customize Ribbon” area as shown in the following screenshots:

2. The template can be created from any word document. For demonstration, I will create a new blank document.
3. The next step is to add some text, images and then some fields that will be populated from a Power Automate flow. The developer tab has several types of dynamic fields that can be added to the template but for almost all scenarios only the following fields(controls) need to be used:
- Plain Text Content Control – This field type can be used to add dynamic text to the template
- Repeating Section Content Control – This control can be used to create dynamic lists such as invoice lines to the template.
4. For each field that is added to the template, a unique name needs to be specified using the properties window as shown in the following screenshot:

Please note that the properties button is enabled only when the field is selected.
On the content properties windows, the title field is used to specify the name of the field. The title will then be visible inside the flow and can be used to identify the fields.

The tag field is not required and will be automatically set to the title value when saved.
5. Similarly, the repeating section content control can be used to add dynamic rows to the template for scenarios such as creating a table of invoice items. To add the control, a table can be inserted and then the control can be added to the first row as shown in the following screenshots:


After adding the control and specifying a name for it, we need to add the plain text content control to each column inside the repeating control as shown in the following screenshots:

6. The following screenshot shows the final template that will be used in this sample:

7. Next, the template needs to be uploaded to a location that is accessible to the Microsoft Word actions in Power Automate. Currently, any SharePoint online or One Drive locations can be used to store the Microsoft Word Templates. For demonstration, I will upload the template to my personal One Drive as shown in the following screenshot:

8. After uploading the template, we need to create a flow and populate the dynamic content in the template. I will create a manual flow to show how the flow can return the output template to other flows.

9. The Power Automate action to populate the template is located under the “Word Online” category as shown in the following screenshot:

10. By selecting the Word Online category from the previous step, the Microsoft Word actions that are available in Power Automate will be shown:

As shown in the above screenshot the “Populate Microsoft Word Template” needs to be used to populate the template with dynamic content.
11. Next, the location of the uploaded template needs to be selected and once the template is specified, the fields in the template will be shown in the action as shown in the following screenshot:

12. To populate the table rows, an array variable with objects can be defined as shown in the following screenshots:


13. After configuring the action that populates the template values in the previous step, the output of the template can be converted to PDF. To convert the output, the template output needs to be stored in a location such as SharePoint Online or One Drive and then converted to a PDF file as shown in the following screenshot:

Please note that as the flow can be executed concurrently, the file name needs to be unique. To create a unique file name a GUID can be appended to the file name as shown in the following screenshot:

14. Next, the output PDF file can be saved to SharePoint Online or One Drive as shown in the following screenshot:

15. Finally, we need to save and run the flow as shown in the following screenshot:

16. After a successful run, the output files are available in the location specified in the flow:

17. The output PDF file will look like the following screenshot:

How to pass the report to the parent flow
In some scenarios, the output PDF or template file needs to be returned to the parent flow. To pass the output as the return value of the flow the “Respond to a PowerApp or flow” action can be used as shown in the following screenshot:
As can be seen in the above screenshot, the output needs to have a name, in this case, the name is “PDF”, and then the output of the PDF conversion or populate template needs to be specified as the value. Please note that to return the value of the PDF file, the output of the conversion to PDF can be returned directly without saving it.
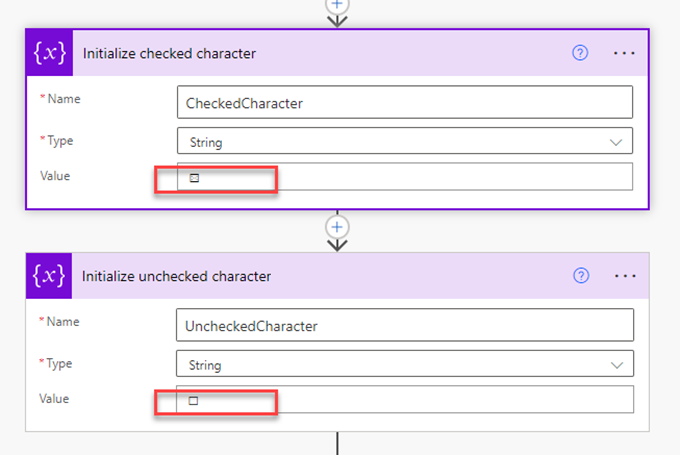
Bonus Tip: How to add a check box to the template
Unfortunately, check box controls (fields) are not supported by Power Automate so to show and populate a check box in the template, we need to pass the checked and unchecked states as strings to the template. The checked and unchecked characters can be defined as variables as shown in the following screenshot:
The following characters can be copied to the flow as shown in the above screenshot:
Checked: ☒
Unchecked: ☐
After defining the checked and unchecked characters, the required character can be passed to the template as shown in the following screenshot:

For demonstration, I have added a Boolean value that will show checked when the value is true and unchecked when the value is false.
The expression that has been used in the “Dynamic Text” field is:
if(variables('SampleBooleanValue'),variables('CheckedCharacter'),variables('UncheckedCharacter'))The following screenshot shows the output of the flow:
As shown in the above screenshot, the unchecked character has been passed to the flow because the Boolean value in the condition is false.